Showing posts with label windows. Show all posts

Tuesday, March 8, 2016

Enable or disable ECN (Explicit Congestion Notification) on Windows

The TCP protocol can detect network congestion with different mechanisms:

  • packets loss
  • timeouts
  • duplicate acknowledgments 

In order to avoid this behavior on a saturated link, TCP ECN  can be enable (on by default on Windows 2012 server). TCP ECN are generated by the network in order to signal to the receiver that the network component is close to drop packets. The receiver can notify the sender to slow down the traffic rate. This mechanisms can react faster than the traditional TCP timeout or DUP ack.

You can use the following command to enable it on Windows:
C:\Windows\system32>netsh int tcp set global ecncapability=enabled
Ok.
Verify:
C:\Windows\system32>netsh int tcp show global
Querying active state...

TCP Global Parameters
----------------------------------------------
Receive-Side Scaling State          : enabled
Chimney Offload State               : automatic
NetDMA State                        : enabled
Direct Cache Acess (DCA)            : disabled
Receive Window Auto-Tuning Level    : normal
Add-On Congestion Control Provider  : none
ECN Capability                      : enabled
RFC 1323 Timestamps                 : disabled
Disable:
C:\Windows\system32>netsh int tcp set global ecncapability=disabled
Ok.

Monday, July 27, 2015

Windows: find the MTU for a specific IP

The following command, give us the MTU for a specific destination:
U:\>netsh interface ipv4 show destinationcache address='IP_addresss'

  • Example on a classic LAN:

U:\>netsh interface ipv4 show destinationcache address=192.168.95.216
Destination              : 192.168.95.216
Next Hop Address         : 192.168.211.254
Source                   : 192.168.211.1
Interface                : Local Area Connection
Path MTU                 : 1500
Upper-layer MTU          : 1480
RTT mean                 : 3000
RTT deviation            : 0
Path transmit speed (Bps): 0
Path receive speed (Bps) : 0
Link transmit Speed (bps): 1000000000
Link receive Speed (bps) : 1000000000


  • Example with an IPsec Tunnel:


U:\>netsh interface ipv4 show destinationcache address=192.168.95.216
Destination              : 192.168.95.216
Next Hop Address         : 192.168.95.216
Source                   : 192.168.243.197
Interface                : Local Area Connection
Path MTU                 : 1400
Upper-layer MTU          : 1380
RTT mean                 : 40
RTT deviation            : 20
Path transmit speed (Bps): 0
Path receive speed (Bps) : 0
Link transmit Speed (bps): 2000000000
Link receive Speed (bps) : 2000000000

Wednesday, November 19, 2014

Windows Automatic Metric for IP routes

I was wondering why sometimes my traffic was going on wireless interface and sometimes on copper interface.
This behavior is due to the automatic Metric feature on windows.
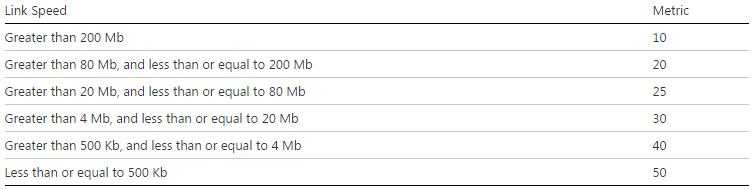
As you can see on the table below if I am connected on a 100Mb, my metric on the copper is 20.


On our site, we have 802.11a/g and 802.11a/g/n access points.

  • When I'm on an a/g antenna (max 54Mbps) and a 100Mb copper inteface, I have the following routing table:

C:\Users\ABCD>netstat -rn

IPv4 Route Table
========================================================================
Active Routes:
Network      Destination        Netmask          Gateway       Interface  Metric
0.0.0.0          0.0.0.0        10.1.1.254       10.1.1.32     20
0.0.0.0          0.0.0.0        10.1.2.254       10.1.2.68     25

  • When I'm on a a/g/n antenna (and my bandwith is more than 200Mb) and a 100Mb copper inteface, I have the following routing table:

C:\Users\ABCD>netstat -rn
IPv4 Route Table
========================================================================
Active Routes:
Network      Destination        Netmask          Gateway       Interface  Metric
0.0.0.0          0.0.0.0        10.1.2.254       10.1.2.68     10
0.0.0.0          0.0.0.0        10.1.1.254       10.1.1.32     20
As you can see the wireless is preferred with a metric of 10. I have chosen the solution to fix by myself the metric on networks interfaces (copper 1 and wireless 20).

start>control Panel>Network and Sharing Center>Change adpater settings
Right click on the Copper card>Properties>Internet Protocol Version 4>Properties>Advanced
Uncheck 'Automatic metric' and fix the metric

For my case, I'm only using the interface metric. But the result in metric seen with the command 'netstat -rn' is the result of an addition (Gateway metric + InterfaceMetric).
In order to find the gateway metric, you can use the command 'netsh int ip show config':
C:\Users\ABCD>netsh int ip show config

Configuration for interface "Local Area Connection"
    DHCP enabled:                         Yes
    IP Address:                           10.1.1.32
    Subnet Prefix:                        10.1.1.0/24 (mask 255.255.255.0)
    Default Gateway:                      10.1.1.254
    Gateway Metric:                       0
    InterfaceMetric:                      20
    DNS servers configured through DHCP:  10.1.2.5
    Register with which suffix:           Primary only
    WINS servers configured through DHCP: None

Configuration for interface "Wireless Network Connection"
    DHCP enabled:                         Yes
    IP Address:                           10.1.2.68
    Subnet Prefix:                        10.1.2.0/25 (mask 255.255.255.0)
    Default Gateway:                      10.1.2.254
    Gateway Metric:                       0
    InterfaceMetric:                      25
    DNS servers configured through DHCP:  10.1.2.5
    Register with which suffix:           Primary only
    WINS servers configured through DHCP: None

Unable to connect to an 802.11n Wi-Fi network if WMM is disabled

If WMM (Wireless Multimedia Extensions) is disabled on a WLAN, devices are not able to connect on 802.11n.

On a Cisco wireless, it's necessary to enable WMM by SSID:
WLANs>Choose WLAN>QoS>WMM>
Choose 'Allowed'

Tuesday, March 13, 2012

Good bye ARP, welcome ICMPv6

Today I was working on an IPv6 lab. I wanted discover the relation between an address MAC and an IP address. So, on the windows machine I execute the command 'arp -a'. It's a bad reflex, why ? ARP no longer exists in IPv6. The equivalent is now realized with ICMPv6. So to discover the correlation between MAC and IP address we have to use these commands:
  • On a windows laptop:
C:\Users\Administrator>netsh interface ipv6 show neighbors 14

Interface 14: LAB

Internet Address                               Physical Address    Type
--------------------------------------------           -----------------             -----------
fe80::2                                             00-14-1c-c9-d9-a8    Stale (Router)
fe80::214:1cff:fec9:d9a8                     00-14-1c-c9-d9-a8    Stale (Router)
ff02::2                                              33-33-00-00-00-02     Permanent
ff02::5                                              33-33-00-00-00-05     Permanent
ff02::c                                              33-33-00-00-00-0c     Permanent
ff02::16                                            33-33-00-00-00-16     Permanent
ff02::1:2                                           33-33-00-01-00-02     Permanent
ff02::1:3                                           33-33-00-01-00-03     Permanent
ff02::1:ff00:2                                     33-33-ff-00-00-02      Permanent
ff02::1:ff00:d                                     33-33-ff-00-00-0d      Permanent
ff02::1:ff00:f                                      33-33-ff-00-00-0f       Permanent
ff02::1:ff08:c77                                 33-33-ff-08-0c-77       Permanent
ff02::1:ffae:564d                               33-33-ff-ae-56-4d       Permanent
ff02::1:ffc9:d9a8                               33-33-ff-c9-d9-a8       Permanent  

  
  • On a Linux laptop (has to be validated):
ip -f inet6 neigh show

  • On a Cisco router:
R2#show ipv6 neighbors
IPv6 Address                                         Age Link-layer Addr    State      Interface
FE80::4491:69A9:39F3:7344                   5     000c.2928.4c53  STALE    Fa0/0
2001:DB9:1:1:DD52:657C:D340:F2FF      19   000c.2980.fc6c   STALE    Fa0/0
2001:DB9:1:1:B140:2298:3E92:A99B       6     000c.2928.4c53  STALE    Fa0/0
FE80::1                                                 4     0016.479a.f630   STALE    Fa0/0
FE80::20C:29FF:FE80:FC6C                  19    000c.2980.fc6c   STALE    Fa0/0
2001:DB9:1:1::1                                     22    0016.479a.f630  STALE    Fa0/0


Wednesday, February 8, 2012

Multi Instances with PuttyCM

By default you can just start one puttyCM instance. For example if several users want to use a puttyCM on  server via RDP it's impossible by default. To open several session you need to modify a key register on windows. Below this key:


HKEY_CURRENT_USER\Software\ACS\PuTTY Connection Manager\
AllowMultipleInstances REG_DWORD 1

Tuesday, June 28, 2011

Filtrage ICMP Redirect sous Windows XP

Le but de ce billet est de décrire la méthode pour que Windows XP ne subisse pas les attaques par ICMP redirect. Petit rappel sur l'ICMP redirect:
L'attaque par ICMP redirect consiste à envoyer des messages (type ICMP 'redirect') à une cible. Le message généré proposera à la victime de passer par un nouveau chemin pour joindre un réseau. De cette manière la machine ne pourra joindre un réseau ou une machine puisque la gateway proposée sera erronée.

Ci-dessous vous trouverez un exemple d'ICMP Redirect généré via scapy:


ip=IP()
ip.src='192.168.20.1'
ip.dst='192.168.20.66' => poste attaqué
icmp=ICMP()
icmp.type=5
icmp.code=1
icmp.gw='192.168.20.100' => GW erronée
ip2=IP()
ip2.src='192.168.20.66' => poste attaqué
ip2.dst='100.100.100.0' => route modifiée
ip2.display
send(ip/icmp/ip2/UDP())


Afin de ce prémunir de ce type d'attaque sur un poste Windows XP, il est cependant possible de modifier la clé de registre Ci-dessous:

HKEY_LOCAL_MACHINE\System\Currentcontrolset\Services \Tcpip\Parameters
EnableICMPRedirect

En passant la valeur à 0 (qui est par défaut à 1), le poste n'interprètera pas ce type de message.