Wednesday, May 20, 2015
Tuesday, May 5, 2015

Monday, March 9, 2015
Migrate from spanning-tree redundancy to LACP
Just a small memo of how migrate from spanning-tree redundancy to LACP with the minimum of outage.
If you follow these steps, you will normally not loose the control to your remote switch (or just during the spanning-tree convergence time).
Before the beginning of the migration, we have the following topology:

Start of the migration:

Access switch:
interface Gig 0/2
shut
Core switch:
int port-channel 10
shut
!
default interface Gi0/2
!
interface Gi0/2
channel-group 10 mode active
!
int po 10
switchport mode trunk
switchport trunk allowed vlan all

Core switch:
interface Gi0/2
shut
Access switch:
interface port-channel 1
!
default interface Gig 0/2
!
int Gig 0/2
channel-group 1 mode active
!
int po1
switchport mode trunk
switchport trunk allowed vlan all
no shut

If you follow these steps, you will normally not loose the control to your remote switch (or just during the spanning-tree convergence time).
Before the beginning of the migration, we have the following topology:
Start of the migration:
interface Gig 0/2
shut
Core switch:
int port-channel 10
shut
!
default interface Gi0/2
!
interface Gi0/2
channel-group 10 mode active
!
int po 10
switchport mode trunk
switchport trunk allowed vlan all
Core switch:
interface Gi0/2
shut
Access switch:
interface port-channel 1
!
default interface Gig 0/2
!
int Gig 0/2
channel-group 1 mode active
!
int po1
switchport mode trunk
switchport trunk allowed vlan all
no shut
Core switch:
interface port-channel 10
no shut

Access switch:
int Gig 0/1
shut
Core switch:
default int Gi0/1
!
int Gi0/1
switchport mode trunk
switchport trunk allowed vlan all
channel-group 10 mode active

Core switch:
int Gi0/1
shut
Access switch:
default int Gig 0/1
!
int Gig 0/1
switchport mode trunk
switchport trunk allowed vlan all
channel-group 1 mode active

Core switch:
int Gi0/1
no shut
interface port-channel 10
no shut
Access switch:
int Gig 0/1
shut
Core switch:
default int Gi0/1
!
int Gi0/1
switchport mode trunk
switchport trunk allowed vlan all
channel-group 10 mode active
Core switch:
int Gi0/1
shut
Access switch:
default int Gig 0/1
!
int Gig 0/1
switchport mode trunk
switchport trunk allowed vlan all
channel-group 1 mode active
Core switch:
int Gi0/1
no shut
Wednesday, January 14, 2015
Avoid tromboning effect on extended Datacenter
If we want extend a datacenter between 2 sites, we have to have the same vlan on these 2 sites.
And as a virtual machine can be located on DC A or DC B, we cannot have static path between the client and the server. If we consider the diagram below we are facing a tromboning issue when a User on site B tries to reach a VM located in DC B.
The traffic follows the path:
client in site B -> router on DC B -> VM (vlan directly connected) -> Gateway in DC A -> Router DC B -> client in site B

However the optimal is:
client in site B -> router on DC B -> VM (vlan directly connected) -> Gateway in DC B -> Router DC B -> client in site B

In order to have this path, we have to have 2 actives HSRP routers on the same vlan.
This can obtained by filtering HSRP request between site on the port-channel.
This can easily be done with the following PACL:
ip access-list extended HSRP-FILTER
10 deny udp any 224.0.0.2 0.0.0.0 eq 1985
20 deny udp any 224.0.0.102 0.0.0.0 eq 1985
30 permit ip any any
!
interface port-channel 10
access-group mode prefer port
ip access-group HSRP-FILTER in
However, we will have a duplicate IP address and logs messages will be generated.
On a Nexus, we can stop this log with the command below on the bvi:
no ip arp gratuitous hsrp duplicate
In my case, I was using Catalyst to interconnect my DC. 'Gratuitous arp' are the source of my problem! This message are sent by the router to announce their IP and their associated MAC. To filter this message and all ARP coming from the HSRP (other site), you can use the PACL to filter it.
As we know how a MAC is built in HSRP, this ACL filter all arp message coming with an address MAC of a HSRP (v1 and v2) source:
mac access-list extended FILTER-ARP-HSRP
deny 0000.0c07.ac00 0000.0000.00ff any
deny 0000.0c9f.f000 0000.0000.0fff any
permit any any
!
int po 10
mac access-group FILTER-ARP-HSRP in
And as a virtual machine can be located on DC A or DC B, we cannot have static path between the client and the server. If we consider the diagram below we are facing a tromboning issue when a User on site B tries to reach a VM located in DC B.
The traffic follows the path:
client in site B -> router on DC B -> VM (vlan directly connected) -> Gateway in DC A -> Router DC B -> client in site B
However the optimal is:
client in site B -> router on DC B -> VM (vlan directly connected) -> Gateway in DC B -> Router DC B -> client in site B
In order to have this path, we have to have 2 actives HSRP routers on the same vlan.
This can obtained by filtering HSRP request between site on the port-channel.
This can easily be done with the following PACL:
ip access-list extended HSRP-FILTER
10 deny udp any 224.0.0.2 0.0.0.0 eq 1985
20 deny udp any 224.0.0.102 0.0.0.0 eq 1985
30 permit ip any any
!
interface port-channel 10
access-group mode prefer port
ip access-group HSRP-FILTER in
However, we will have a duplicate IP address and logs messages will be generated.
On a Nexus, we can stop this log with the command below on the bvi:
no ip arp gratuitous hsrp duplicate
In my case, I was using Catalyst to interconnect my DC. 'Gratuitous arp' are the source of my problem! This message are sent by the router to announce their IP and their associated MAC. To filter this message and all ARP coming from the HSRP (other site), you can use the PACL to filter it.
As we know how a MAC is built in HSRP, this ACL filter all arp message coming with an address MAC of a HSRP (v1 and v2) source:
mac access-list extended FILTER-ARP-HSRP
deny 0000.0c07.ac00 0000.0000.00ff any
deny 0000.0c9f.f000 0000.0000.0fff any
permit any any
!
int po 10
mac access-group FILTER-ARP-HSRP in
Thursday, December 18, 2014
Connexion to SSH device with python and paramiko
Previously, I was using 'pexpect' in order to connect and gather information from a router or a switch.
However, I have often encountered several issues (timeout, SSH key gestion...).
It's why, now I'm using 'paramiko' (a python SSH library).
You will find below an example of the paramiko utilisation.
This script connects to a switch and returns it version.
Don't hesitate to share examples.
import paramiko
import time

username = 'user'
pwd = 'password'
cmd = 'show version \n'
ip_switch = '10.10.20.17'
remote_conn_pre=paramiko.SSHClient()
remote_conn_pre
remote_conn_pre.set_missing_host_key_policy(paramiko.AutoAddPolicy())
remote_conn_pre.connect(ip_switch, username=username, password=pwd)
remote_conn = remote_conn_pre.invoke_shell()
time.sleep(1)
trash = remote_conn.recv(5000)
remote_conn.send(cmd)
time.sleep(2)
output = remote_conn.recv(5000)
chain = output.split()
print chain[9]
Wednesday, November 19, 2014
Windows Automatic Metric for IP routes
I was wondering why sometimes my traffic was going on wireless interface and sometimes on copper interface.
This behavior is due to the automatic Metric feature on windows.
As you can see on the table below if I am connected on a 100Mb, my metric on the copper is 20.
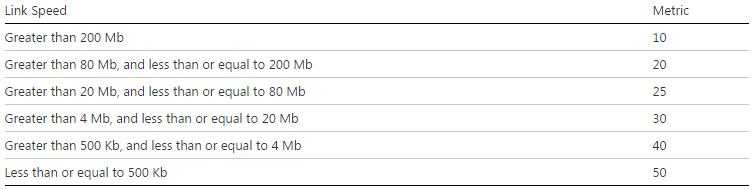
On our site, we have 802.11a/g and 802.11a/g/n access points.
C:\Users\ABCD>netstat -rn
IPv4 Route Table
========================================================================
Active Routes:
Network Destination Netmask Gateway Interface Metric
0.0.0.0 0.0.0.0 10.1.1.254 10.1.1.32 20
0.0.0.0 0.0.0.0 10.1.2.254 10.1.2.68 25
C:\Users\ABCD>netstat -rn
IPv4 Route Table
========================================================================
Active Routes:
Network Destination Netmask Gateway Interface Metric
0.0.0.0 0.0.0.0 10.1.2.254 10.1.2.68 10
0.0.0.0 0.0.0.0 10.1.1.254 10.1.1.32 20
As you can see the wireless is preferred with a metric of 10. I have chosen the solution to fix by myself the metric on networks interfaces (copper 1 and wireless 20).
start>control Panel>Network and Sharing Center>Change adpater settings
Right click on the Copper card>Properties>Internet Protocol Version 4>Properties>Advanced
Uncheck 'Automatic metric' and fix the metric
For my case, I'm only using the interface metric. But the result in metric seen with the command 'netstat -rn' is the result of an addition (Gateway metric + InterfaceMetric).
In order to find the gateway metric, you can use the command 'netsh int ip show config':
C:\Users\ABCD>netsh int ip show config
Configuration for interface "Local Area Connection"
DHCP enabled: Yes
IP Address: 10.1.1.32
Subnet Prefix: 10.1.1.0/24 (mask 255.255.255.0)
Default Gateway: 10.1.1.254
Gateway Metric: 0
InterfaceMetric: 20
DNS servers configured through DHCP: 10.1.2.5
Register with which suffix: Primary only
WINS servers configured through DHCP: None
Configuration for interface "Wireless Network Connection"
DHCP enabled: Yes
IP Address: 10.1.2.68
Subnet Prefix: 10.1.2.0/25 (mask 255.255.255.0)
Default Gateway: 10.1.2.254
Gateway Metric: 0
InterfaceMetric: 25
DNS servers configured through DHCP: 10.1.2.5
Register with which suffix: Primary only
WINS servers configured through DHCP: None
This behavior is due to the automatic Metric feature on windows.
As you can see on the table below if I am connected on a 100Mb, my metric on the copper is 20.
On our site, we have 802.11a/g and 802.11a/g/n access points.
- When I'm on an a/g antenna (max 54Mbps) and a 100Mb copper inteface, I have the following routing table:
C:\Users\ABCD>netstat -rn
IPv4 Route Table
========================================================================
Active Routes:
Network Destination Netmask Gateway Interface Metric
0.0.0.0 0.0.0.0 10.1.1.254 10.1.1.32 20
0.0.0.0 0.0.0.0 10.1.2.254 10.1.2.68 25
- When I'm on a a/g/n antenna (and my bandwith is more than 200Mb) and a 100Mb copper inteface, I have the following routing table:
C:\Users\ABCD>netstat -rn
IPv4 Route Table
========================================================================
Active Routes:
Network Destination Netmask Gateway Interface Metric
0.0.0.0 0.0.0.0 10.1.2.254 10.1.2.68 10
0.0.0.0 0.0.0.0 10.1.1.254 10.1.1.32 20
As you can see the wireless is preferred with a metric of 10. I have chosen the solution to fix by myself the metric on networks interfaces (copper 1 and wireless 20).
start>control Panel>Network and Sharing Center>Change adpater settings
Right click on the Copper card>Properties>Internet Protocol Version 4>Properties>Advanced
Uncheck 'Automatic metric' and fix the metric
For my case, I'm only using the interface metric. But the result in metric seen with the command 'netstat -rn' is the result of an addition (Gateway metric + InterfaceMetric).
In order to find the gateway metric, you can use the command 'netsh int ip show config':
C:\Users\ABCD>netsh int ip show config
Configuration for interface "Local Area Connection"
DHCP enabled: Yes
IP Address: 10.1.1.32
Subnet Prefix: 10.1.1.0/24 (mask 255.255.255.0)
Default Gateway: 10.1.1.254
Gateway Metric: 0
InterfaceMetric: 20
DNS servers configured through DHCP: 10.1.2.5
Register with which suffix: Primary only
WINS servers configured through DHCP: None
Configuration for interface "Wireless Network Connection"
DHCP enabled: Yes
IP Address: 10.1.2.68
Subnet Prefix: 10.1.2.0/25 (mask 255.255.255.0)
Default Gateway: 10.1.2.254
Gateway Metric: 0
InterfaceMetric: 25
DNS servers configured through DHCP: 10.1.2.5
Register with which suffix: Primary only
WINS servers configured through DHCP: None
Unable to connect to an 802.11n Wi-Fi network if WMM is disabled
If WMM (Wireless Multimedia Extensions) is disabled on a WLAN, devices are not able to connect on 802.11n.
On a Cisco wireless, it's necessary to enable WMM by SSID:
WLANs>Choose WLAN>QoS>WMM>
Choose 'Allowed'
On a Cisco wireless, it's necessary to enable WMM by SSID:
WLANs>Choose WLAN>QoS>WMM>
Choose 'Allowed'
Subscribe to:
Posts (Atom)